Below are some tried-and-true reading and note taking strategies. In addition to the strategies listed on this page, the UVU Assistive Technology Center has a fantastic list of Apps for Student Success, including apps for note taking, speech-to-text, reading and study apps, and more.
One easy-to-access "readability improvement" app on your desktop is Bionic Reading. You can try it here!
Reading is a thought process that involves figuring out what is important, what you need to know, and how you will use the information. Take note of the following basic reading strategies:
Survey: Glance through all the headings in the chapter, and read the beginning and final summary paragraphs. Do not spend more than a few minutes on this process. You should be able to find three to six main ideas that the chapter is discussing.
Question: Begin to work. Turn the first heading into a question. For example, 'Quadratic Formula,' you might ask what is the quadratic formula, how is it used or how is it derived. If your heading reads 'Mason Dixon Line,' you might ask what is it, why was it a compromise, or what were the results of this. Asking questions will arouse your curiosity and thus increase your comprehension. Questions will also make important points stand out.
R1 Read: Read to answer the question, but read only to the end of each section. Search for the answer as you read. This is not passive, but active reading.
R2 Recite: Having read the first section, look away from the book and try to briefly answer your question. Use your own words, and cite an example. If you can do this, you know what is in the text. If you cannot, glance over the section again. An excellent way to do this reciting from memory is to write down short cue phrases. This process involves more senses that will help you remember the material better. Repeat this process with each section until the entire assignment is finished.
R3 Review: When you have finished reading the entire assignment in this way, go over your notes to get a quick look at the points and their relationship to each other. Check your memory by reciting the major sub points under each heading. Try covering up your notes and reciting them, then expose the main points and try to list the sub points.
Go through your text and use tabs, stickies, post-it-notes, or tape. Mark the beginning of each chapter. If there are reviews in a chapter, tab those. At the end of the book are important appendices you will want to mark. If your book has answers, mark those. If you find some very important information, tab that. You may want to use different colors for different sections, e.g. red for chapters, yellow for reviews, another color for answers, yet another color for the preface information.
The advantages of tabbing:
Reading Control Boxes
Review the chapter or section. Select a logical stopping place in the text, and jot down a small box. Do this for the whole chapter. As you're reading, when you get to the box, stop and think about what you have read. Put it in your own words. Make sure that you understand the material. It may even help to make notes on what you have read. If your box is not in a logical place when you are reading, move it. If you understand what you have read, put a check in the box. But if you don’t, go back and reread, maybe even out loud.
Some of the advantages of this type of reading are if you have to stop reading, you know exactly where you quit and know where to start up again. It is also easier to make sure you focus on what you are reading for a certain length of time rather than focusing on the entire chapter.
By checking for understanding, making notes on what you are reading, and going over you notes when you are done, you have essentially gone over the material four times: reading; vocalizing what is being said in your own words; making notes; going over your notes. This saves you from having to reread the material over and over again!
There are several styles of note taking which are appropriate for college. Listed at the bottom are some of the methods. Whatever style you choose, here are some basic ideas:
Processing your notes within 24 hours of the class period is a final step in making sure you get the most out of attending each class. Note processing can be divided into three stages: reflect, relate, and apply. Here is an overview of what processing your notes means:
Cornell University on Cornell Notes
First Review: Reading to identify and learn main points. Make incomplete sentence complete, add additional thoughts. Identify central ideas of the lecture.
Second Review: Summarizing - recite the important main ideas of the lecture by summarizing in your own words. The summary can be verbal or written or both.
Third Review: Question and Answer - ask specific questions about the lecture. The questions and the answers to the questions should be written down to be easily accessible for review.
Types of Questions*
* Be selective in the question you choose to use, as you do not have adequate time to use them all.
Ways to Improve
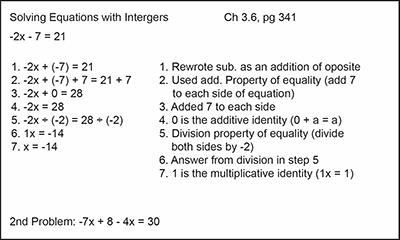
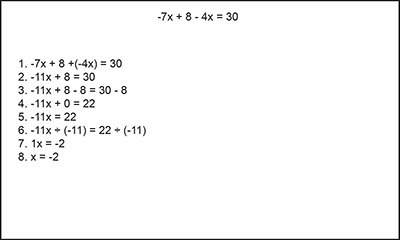
Step 1. Record each problem step in the Examples section
Step 2. Record the reasons for each step in the Explanation/Rules using abbreviations, short sentences etc.
Step 3. Record key words and concepts in the left margin either during or immediately after lecture by reworking your notes.
Step 4. Cover up the Examples and Explanations/Rules sections and recite out loud the meaning of the keywords.
Step 5. Place check marks by keywords you do not know, and keep reviewing them until you do.
Step 6. Develop a math glossary for difficult to remember keywords and concepts.= is, is equal to, is the same
≠ is not, is not equal to
→ goes to, or produces, results in
i.e. that is
e.g. for example
∴ therefore
w/ with
w/o without
> is greater than
< is less than
n.b. note well, this is important
wrkg working (sometimes eliminating just the vowels may help)
∈ belongs to, is a member of
∉ does not belong to, is not a member of
⊂ is contained in
⊄ is not contained in
Use card in a two-stack study system. The cards you are learning carry with you. The cards you have mastered, place in a review stack to be reviewed weekly. If during the weekly review, you find concepts, etc. you are hesitant about, carry them with you again until you have mastered them, then return them to the review stack.
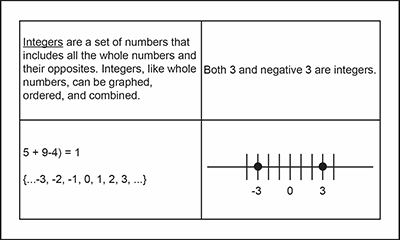
Having in mind a clear definition of math vocabulary and concepts is vital for understanding. Use the same two-stack study process for these cards as you do the How to, Understand cards.
Example:
Front:
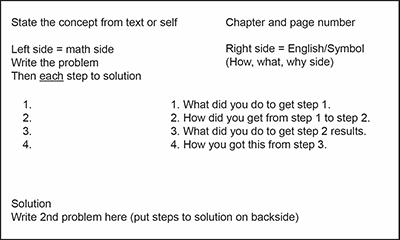
Back:
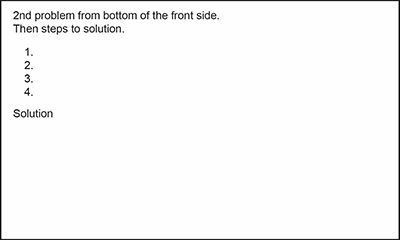
Front:
Back:
Front:
Back:

Front:
Back: