Classroom Help

 
Room not working?

Call us — we'll help right now

Fastest way to get unstuck. When you call, tell us your room number and what you see.

801-863-1111
 
Or find it yourself
Quick Start GuideNew here? How to start the roomTroubleshootingSomething isn't working — try a quick fix

Quick Start Guide


A one-page overview of how to get started in this room. For step-by-step detail, see the System Start Details Guide below.
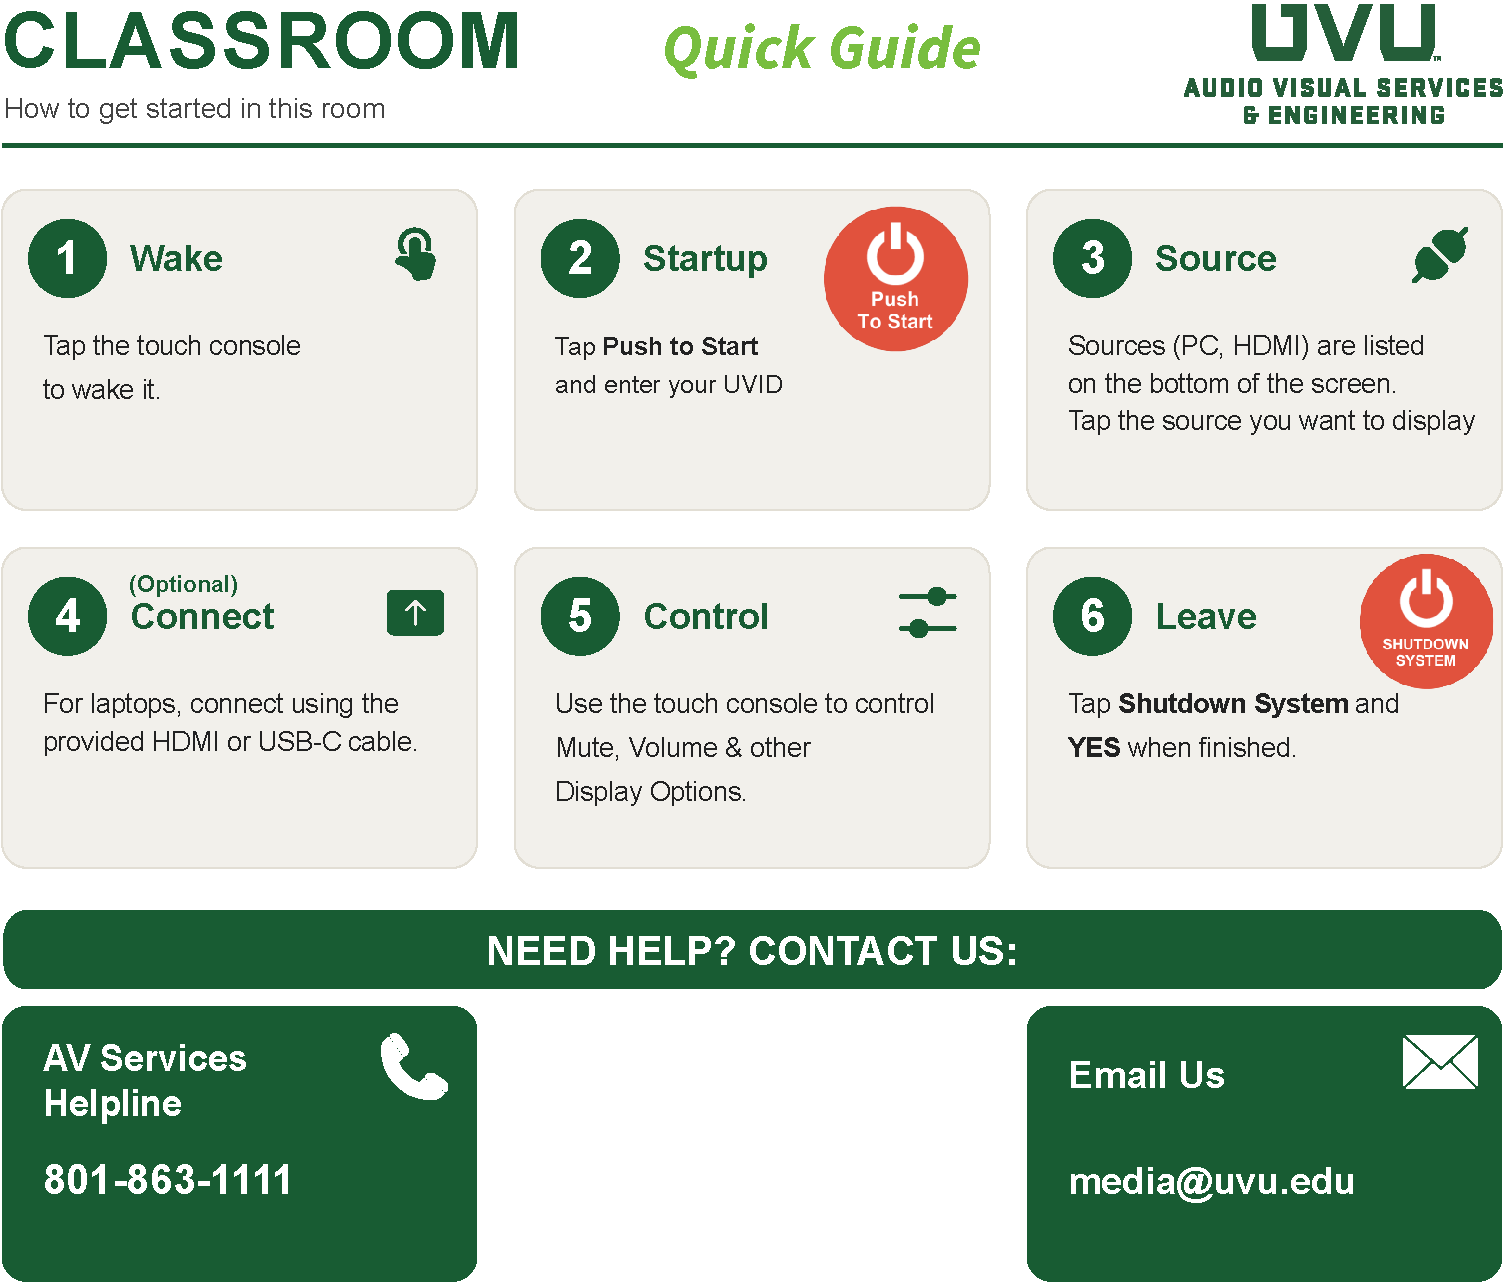
classroom quick guide

↑  Download this quick guide (PDF) to keep or print

Features Guide


Instructions for using the equipment in UVU classrooms. Each section stands on its own — open the one you need.

1. Present wirelessly with AirMedia
When to use this: You want your laptop on the classroom screen without connecting a cable.

There's no software to install and no adapter to plug in — you'll use the wireless display feature already built into your laptop.

Not every classroom has AirMedia. Your room has it if there's an AirMedia button in the source row along the bottom of the touchpanel. If there's no AirMedia button, connect with a cable instead.
Start the system
1Tap Push To Start on the touchpanel.
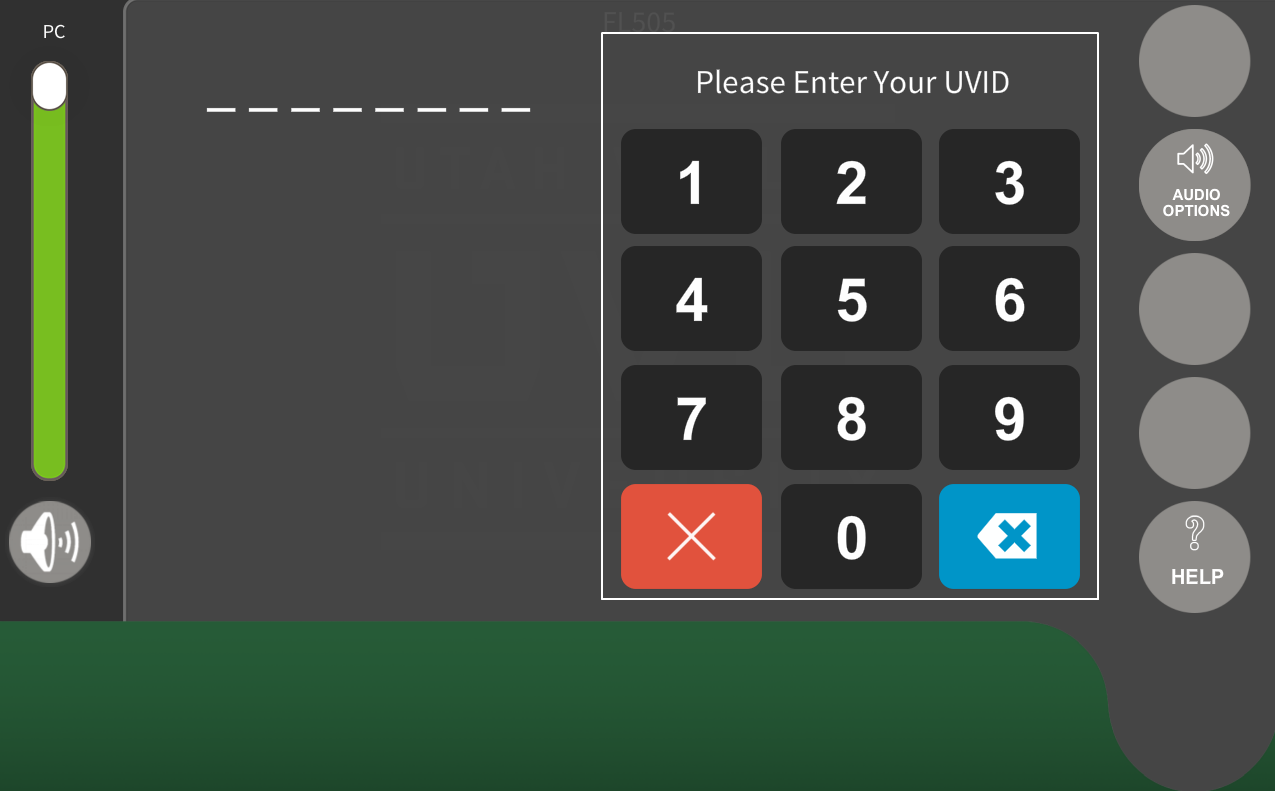
2Enter your UVID on the keypad that appears.

The source buttons appear along the bottom of the screen once the system starts.
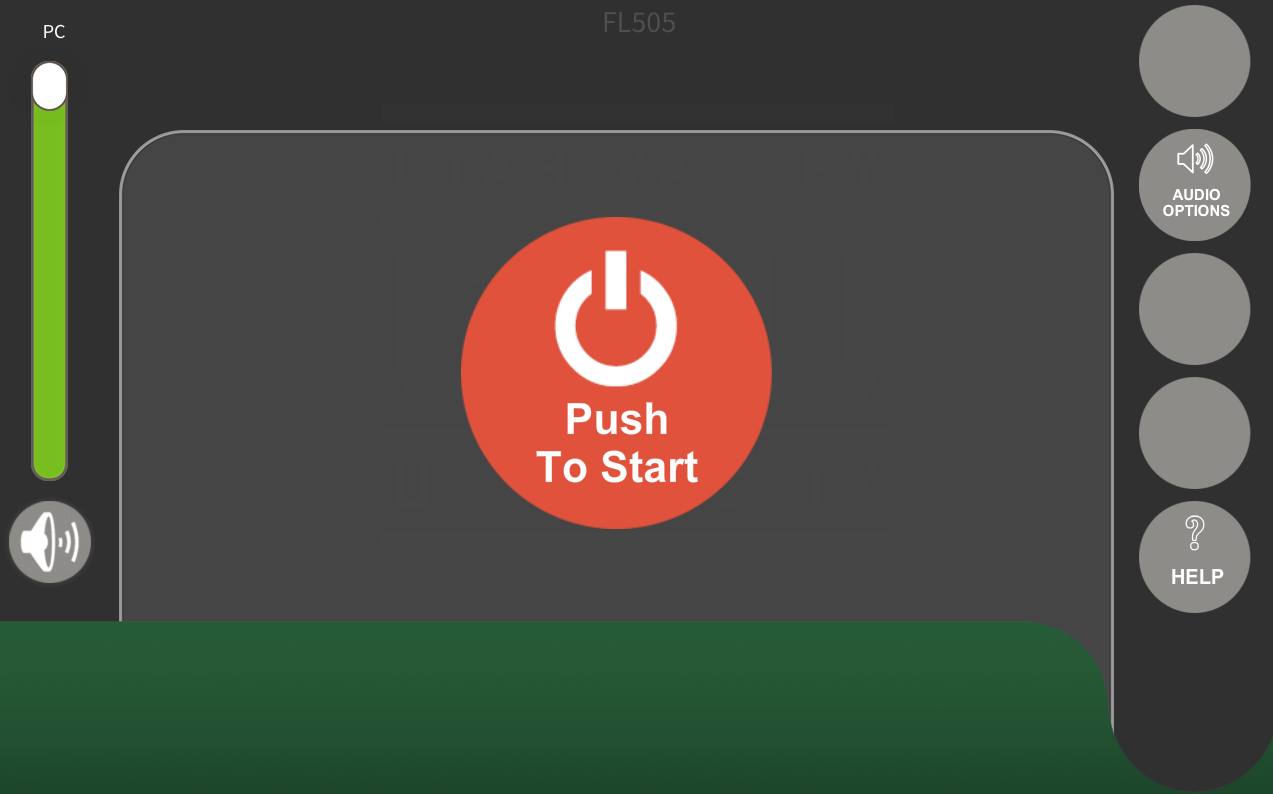
The touchpanel before the system is startedEntering your UVID on the touchpanel
Select AirMedia
1On the touchpanel, select AirMedia from the sources along the bottom of the screen.
2The room display shows connection instructions, including the name of the room.
Connect from your laptop

Connect your laptop to Wolverine-WiFi, then follow the steps for your operating system.
Windows
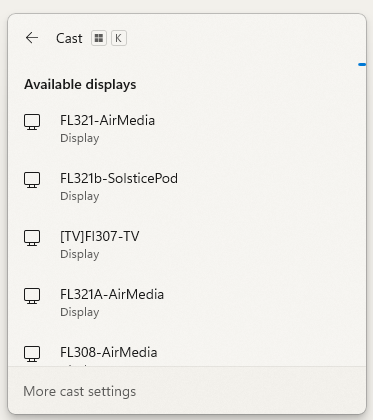
1Press Windows key + K.
2Select your room from the list of available displays.
3Your screen appears on the classroom display.
The Windows cast panel. Select the entry that matches your room
Mac
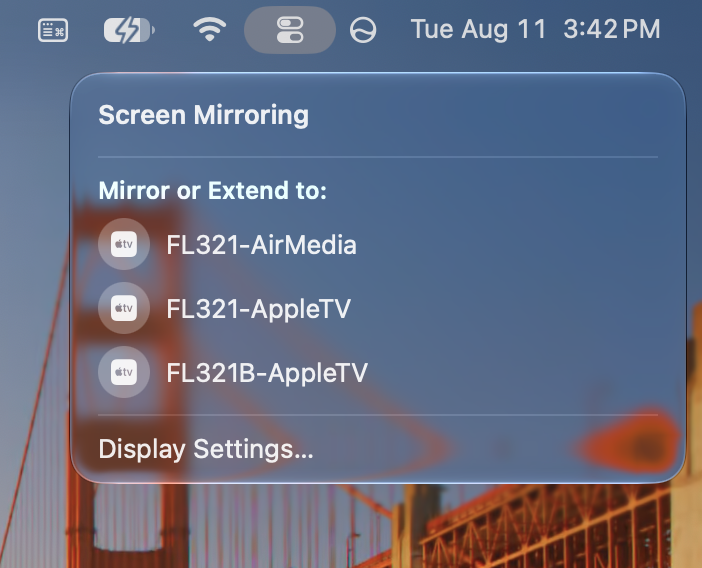
1Open Control Center and choose Screen Mirroring.
2Select your room from the list.
3Your screen appears on the classroom display.
macOS Screen Mirroring. Select the entry that matches your room

Several rooms may appear in the list, so check the name against the one shown on the room display.

Stop presenting

Disconnect the same way you connected.

On Windows, press Windows key + K and select Disconnect.
On a Mac, open Screen Mirroring in Control Center and turn it off.
If your laptop doesn't list the room
Check that you're connected to Wolverine-WiFi. This is the most common cause.
Confirm AirMedia is the selected source on the touchpanel. The room appears only while AirMedia is active.
Check that the room name on the display matches the one you're selecting.
2. Present from the classroom computer
When to use this: You want to show slides, a document, or a website using the computer at the instructor station.
What you need: Your UVID and UVU password.
Start the system
1Tap Push To Start on the touchpanel.
2Enter your UVID on the keypad that appears.
3Select PC from the sources along the bottom of the screen.
The touchpanel before the system is startedEntering your UVID on the touchpanel
Turn on the computer

The classroom computer must be powered on manually. The touchpanel doesn't do this for you.

1Press the power button on the classroom computer.
2Wait for it to start.
Log in

Sign in with the following:

Username: [email protected]
Password: your UVU password
Open your material

Open your presentation, document, or browser as you normally would.

If you need a USB drive, the USB ports are on the front of the computer.

When you're finished
1Log off the computer. Don't leave it signed in for the next instructor.
2On the touchpanel, tap SHUTDOWN SYSTEM.
3. Teach with remote students over Teams
When to use this: Some students attend in the classroom and others join online.
What you need: Your UVID and UVU password, and your class meeting or Teams link.

You'll run the Teams meeting from the classroom computer. Every classroom has a camera at the back of the room and a ceiling microphone, both connected to the classroom computer, so remote students can see and hear the room.

About recordings: Classes are recorded automatically by the campus lecture capture system, which follows the room schedule. You don't need to start anything. Recording in Teams is separate and optional, and is useful if you want your own copy of the online session.
Start the system and log in
1Tap Push To Start on the touchpanel and enter your UVID on the keypad.
2Select PC from the sources along the bottom of the screen.
3Power on the classroom computer manually if it's off.
4Sign in with [email protected] and your UVU password.
The touchpanel before the system is startedEntering your UVID on the touchpanel
Start your Teams meeting
1On the classroom computer, open Microsoft Teams.
2Open your class meeting and click Join, or start a Meet now meeting.
Check the camera and microphone

Microphone. Each classroom computer has only one microphone configured, the ceiling microphone, so you shouldn't need to change it. Speak and watch the level indicator to confirm it's picking you up.

Speaker. The classroom computer has only one audio output, so meeting audio plays through the room speakers automatically.

Camera. The computer may detect two cameras: the room camera at the back, and the document camera. Device names vary between rooms, so use the preview to identify the correct one.
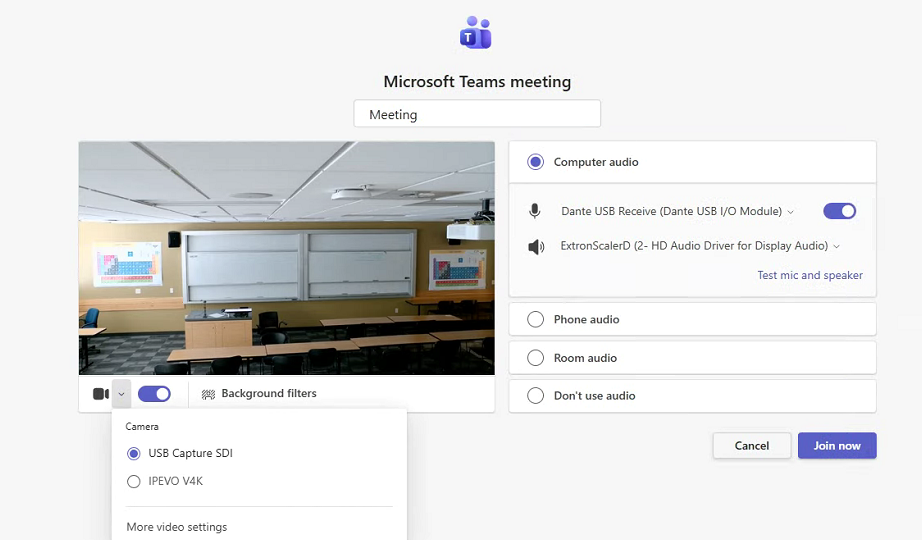
1Go to More > Settings > Device settings.
2Under Camera, switch between the options and watch the preview.
3Choose the camera showing the room.
The camera preview confirms you have selected the room camera rather than the document camera

If remote students report seeing a close-up of the desk instead of the room, the document camera is selected. Switch cameras using the preview.

Aim the camera

The camera uses preset positions. There's no manual pan, tilt, or zoom control.

1On the touchpanel, open RECORDING & STREAM.
2Choose the preset that frames what you need.
Track PresenterFollows you as you move around the room
Presenter & ScreenYou and the projected screen together
Presenter OnlyYou only
Whiteboard OnlyThe whiteboard
Screen OnlyThe projected screen only
User Preset 4A custom position saved for this room

The Camera Preview on this screen shows what the camera currently sees, so you can check the framing before class begins.

Presentation in the recording. The Enabled and Disabled button on this screen controls whether your shared content appears in the automatic recording. Turning it off removes the presentation from the recording, but the room microphone continues to record audio.
Share your material with remote students
1In Teams, click Share.
2Choose your screen or a specific window.

Remote students see what you're showing, and students in the room see it on the classroom display.

The ceiling microphone generally picks up questions from students in the room, so remote students can hear them without you repeating the question.

When you're finished
1Leave the Teams meeting.
2Log off the classroom computer.
3On the touchpanel, tap SHUTDOWN SYSTEM.

Need help

 Call 801-863-1111 — please include the room number.

Troubleshooting


Quick first move: log out and back in on the podium touch panel. It re-fires the room's setup and clears a lot of projector and display problems in about 30 seconds.

Tap what you see for a quick fix to try right now.

No sound from the room speakers
1On the room PC, right-click the speaker icon (bottom-right) → Sound settings, and set the output to Extron — pick the real one, not a duplicate.
2On the touch panel, make sure the volume isn't at zero or muted.
3If the volume slider won't move, the panel has lost connection — that needs us.

Most common cause: a Windows update or reboot switched the PC's audio to the wrong device.

Still no sound? Call & give your room number
Projector's on, but nothing from the PC shows
1Log out of the touch panel, wait 5 seconds, and log back in — this re-sends the video to the projector.
2If there's a PC source button, make sure it's selected.
3Give the projector 30–60 seconds to sync after you log in.
4If the projector shows “No Signal” or “HDBaseT Not Found,” it's a hardware issue — call us.

Most common cause: the switcher stopped passing the PC signal, often after a reboot shifted the input.

Still blank? Call & give your room number
My laptop won't show on the screen
1On the touch panel, select HDMI (or Laptop) as the source.
2Windows: press Win + P → Duplicate or Extend.  Mac: System Settings → Displays → Mirror.
3Unplug and firmly re-seat the cable at the podium or floor box.
4On USB-C? Try a regular HDMI cable instead if one's available.

Most common cause: the source wasn't selected, a loose or damaged cable, or a USB-C adapter issue.

Still stuck? Call & give your room number
Touch panel is frozen or stuck on “Connecting to Control System”
!This one isn't user-fixable — the equipment is locked inside the podium. Call AVSE and include the room number.

What's usually happening: the touch panel lost its network link to the room controller, so it can't control anything.

Call 801-863-1111
Class recording is missing, has no sound, or the camera's aimed wrong
1Check the camera's light — blue means it's recording.

The rest needs us: the recording, its audio, and the camera's aim are all managed by AVSE — often fixable remotely, but not from the podium. Call and we'll sort it out.

Call & give your room number

Good to know

 Everything is run from the touch panel at the podium.
 Logging out and back in re-fires the room setup and fixes many display issues.
 A blue light on the camera means class is recording.
 When you call, always include the room number and what you see.