Text Formatting

Download PDF

Text formatting describes features within word processors that are used to change the appearance of the text, such as its size and color. Knowing how to format text helps to make written work look consistent and professional. Formatting can also add emphasis, style, or additional meaning to text. Most word processers allow you to format text using options in the toolbar and following similar steps.

Microsoft Word and Google Docs are two of the most common word processors. Both programs have several text-formatting features, including font type, font size, bold, italics, underline, text color, and highlight. Taking the time to correctly format a document is often part of following style and citation guidelines.

If you can’t find formatting options, they may be hidden because your window is too small to show them. Try maximizing your window or trying one of the following tricks to reveal hidden options:

Photo of the pin icon in Microsoft Word

In Microsoft Word (Windows), if the top toolbar is hidden, click on the “view” tab to show the toolbar. Click the pin icon in the far bottom-right of the toolbar to keep at the top of the page.

In Microsoft Word (Mac), click the “view” tab to hide or reveal the toolbar.

Google Docs three vertical dots to see hidden tools

In Google Docs, click the three vertical dots on the right of the toolbar to see hidden tools.

Text-Formatting Basics

There are two main ways to apply text-formatting, which are standardized across both Microsoft Word and Google Docs.

Changing Formatting Before You Type

If you change a text-format setting before you type, everything you type from then on will use that format.

  1. Type until you reach a part that needs special formatting
  2. Change the formatting setting
  3. Type the words that need special formatting
  4. Change the setting back to normal
  5. Continue typing the rest of the text

How to change format before you type

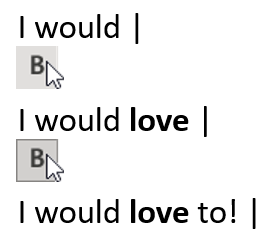
This is useful when you know the next words you type will need to be formatted in a specific way.

Changing Formatting After You Type

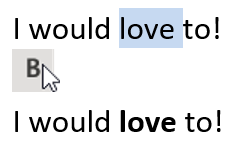
If you want to change the format of text you have already written:

  1. Select the text you want to change
  2. Change the formatting setting

How to change format after you type

Font

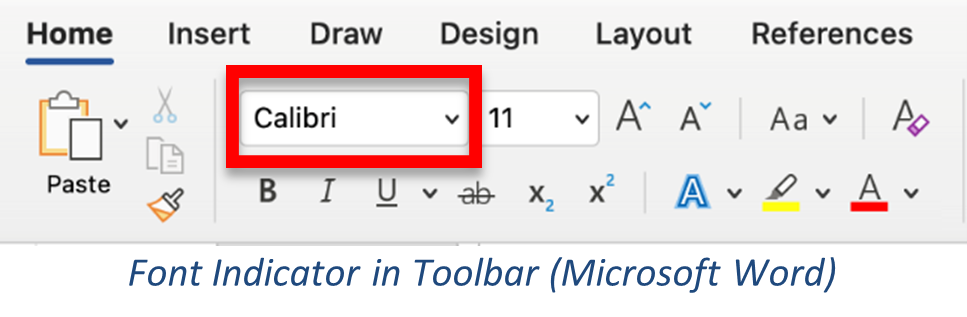
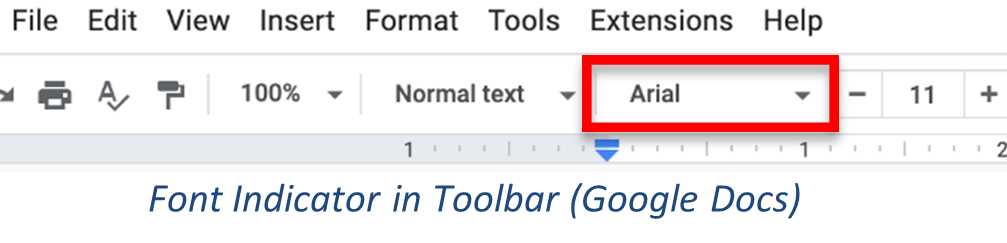
Font describes the style of a text’s lettering. There are many fonts you can choose from, but most academic work will be written in Arial, Calibri, Times New Roman or another simple font.

To change font:

  1. Select the text you want to change
  2. Find the text-formatting options:
    • In Microsoft Word, the font section is in the “Home” tab on the left side of the top toolbar
    • In Google Docs, look in the middle of the top toolbar
  3. Find the box that shows the font name and click the arrow next to it
  4. Click on the font name you want from the drop-down menu

Font Indicator in Toolbar of Microsoft Word

Font Indicator in Toolbar of Google

Tip for finding fonts in Microsoft Word

To search for a specific font, type its name in the font box. As you type, font names will autofill; when the font name you want has auto-filled, press Enter to apply that font. If you have the menu open, the font name will also be highlighted in the list.

Font Size

Font size describes the size of the text and how much space it will take up on a page. Headings and subheadings are often in a larger font than the rest of the text.

To change font size:

  1. Highlight the text you want to change
  2. In the font section of the toolbar, find the box with a number inside it
    • In Microsoft Word, click the arrow next to the box
    • In Google Docs, click the box
  3. Within the drop-down menu that appears, click the font size you want
    • Alternatively, you can type the size you want, and press Enter

Font Size Drop-Down menu in Microsoft Word

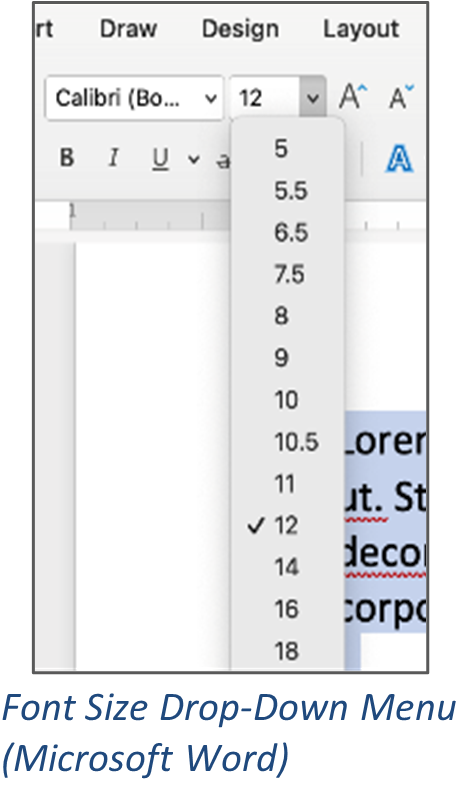
Microsoft Word and Google Docs also provide buttons to quickly increase and decrease font size. In Microsoft Word, click the bigger and smaller letter “A” buttons to the right of the font size box. In Google Docs, click the + and - symbols to either side of the font size number.

Bold, Italics, and Underline

Bold, italics, and underline are common text-formatting features. The bold feature thickens the text’s individual characters, like this. Bold is often used to make paper titles, keywords, subheadings, or other pieces of text stand out and guide the readers eye. The italics feature tilts the characters of text slightly to the right, like this. Italics are often used to indicate something is a title, or to add emphasis to a word or phrase. The underline feature inserts a line under the text, like this, and can also be used to add emphasis.

To bold, italicize, or underline your text:

  1. Select the text you want to change
  2. Find the text-formatting options:
    • In Microsoft Word, the font section is in the “Home” tab on the left side of the top toolbar.
    • In Google Docs, look in the middle of the top toolbar
  3. Bold, italicize, or underline the text:
    • To bold the text, click the capital letter “B”
    • To italicize the text, click the capital letter “I”
    • To underline the text, click the capital letter “U”
  4. In most word processors, you can also bold, italicize, and underline text by using keyboard shortcuts:
    • To bold the text, type Ctrl + B on Windows or Cmd + B on Mac.
    • To italicize the text, type Ctrl + I on Windows or Cmd + I on Mac.
    • To underline the text, type Ctrl + U on Windows or Cmd + U on Mac.

Text Color

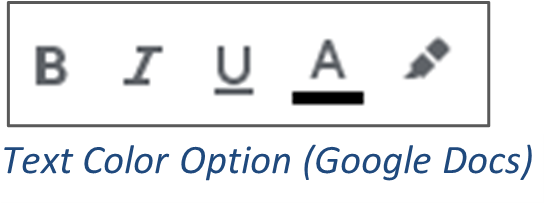
The text color feature changes the color of text, like this.

To change text color:

  1. Select the text you want to change
  2. In the font section of the toolbar, find the button with a capital “A” and a rectangle beneath it
    • In Microsoft Word, click the arrow next to the button
    • In Google Docs, click the button
  3. Click the color you want to use from the color palette drop-down menu

Text Color Option in Microsoft Word

Text Color Option in Google

Highlight

The highlight feature inserts a colored filler behind text, like this.

To highlight text:

  1. Select the text you want to highlight
  2. In the font section of the toolbar, find the marker icon
    • In Microsoft Word, click the arrow next to the marker icon
    • In Google Docs, click the marker icon
  3. Click the color you want to use

Text Highlight Option in Microsoft Word

Text Highlight Option in Google

Clear Formatting

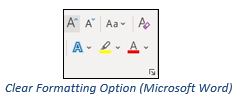
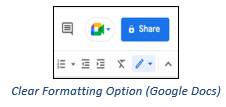
The clear formatting feature removes all special formatting from text.

To clear formatting:

  1. Select the text you want to change
  2. Find and click the clear formatting button
    • In Microsoft Word, go to the “Home” tab and look in the “Font” section for an “A” with an eraser beside it
    • In Google Docs, look for a crossed-out “T” in the right of the top toolbar

Clear Formatting Option in Microsoft Word

Clear Formatting Option in Google

Alternatively, you can use a keyboard shortcut:

  • Microsoft Word for Windows: Ctrl + Spacebar
  • Microsoft Word for Mac: Ctrl + Spacebar
  • Google Docs for Windows: Ctrl + \
  • Google Docs for Mac: Cmd + \